Sergey Maskalik

Sergey Maskalik's blog

Focusing on improving tiny bit every day

A New, Fresh Look at Old and Boring

I get excited when playing with frameworks that are different and challenging to a widely-accepted view on the subject at hand. One of those commonly accepted notions is that in order to build a content management system (CMS), you need a web server and a database. One guy who challenged that notion is Tom Preston-Werner who, in his original article “Blogging Like a Hacker”, set out to fix his frustrations with existing systems. He wrote:

I was tired of complicated blogging engines like WordPress and Mephisto. I wanted to write great posts, not style a zillion template pages, moderate comments all day long, and constantly lag behind the latest software release.

He broke down the problem and realized that the core of the platform is your content, your layout, and the templating engine that will allow you to format and display your content. A simple, genius solution that he came up with is a static site generator, a project named Jekyll that will take your posts in the form of markdown files and run them through a generator that converts your layout and templates into a fully-generated static site. You can take that and host it anywhere you like because it’s just a simple site with static files.

Jekyll: A Perfect Fit

Markdown Format

I already love markdown format. I think it fits perfectly with the web. It allows you to craft simple web pages without HTML getting in your way, and it’s unified. There are now numerous editors that support markdown, so you get to choose the one you like rather than get stuck with what your CMS or blogging platform has to offer. In addition, your blog posts are physical text files that you can save in source control or back up in something like Dropbox. And if you ever decide to switch platforms, you can easily take and import those files to the new and shiny thing.

Simple HTML Layouts

You can create your own simple HTML files and drop Liquid template variables to display the content. Super simple and powerful.

Here is an example of a post page with template tags.

<div class="home entry">
  <h1>{{ page.title }}</h1>
  <span class="date">{{ page.date | date_to_long_string }}</span>
  {{ content }} ...
</div>

The page tags are also custom, and you can define your own. It’s as flexible as you can imagine. Here is an example:

---
layout: post
title: "Going Database Free Feels Great"
tags: ["jekyll", "cms"]
---

The date comes from the file name. Jekyll uses filename convention to pull the post date, so your post has to start with a date, for example: 2013-09-21-myblogpost.html.md

You can also generate sitemap and feed files, as well as define your own URL structure, and much more.

Super cheap

Did I mention that it’s super cheap to host a static site because you don’t need that fancy web server and database? All you need is an Amazon S3 account, and it will cost you pennies every month to run your site. You can just as easily host your site on Github for free.

Unlimited traffic

How many times have you seen articles on Hacker News that, when you click on them, give you a nice 500-page error? That’s because their Wordpress on the shared hosting cannot handle all the traffic, and it just bogs down. Well, with static sites hosted in the cloud, you get unlimited traffic potential out of the box. It will serve almost any amount of traffic you can throw at it.

Secure as it can get, no need to maintain

The beauty of the static site is that it’s simple and doesn’t have any programming logic. You don’t need to download any patches or security updates-it’s all just static HTML file goodness. Feels like we are back in 1996, and it’s awesome!

Static Site + CDN = FAST!

Now to my favorite part. Being a performance freak, I have to admit that I decided to try it out because I knew that putting a CDN in front of the static site can make it really fast. I tried Amazon Cloud Front at first, but their speed was not very impressive. I was getting 600-700 ms response times, which is slower than the DiscountASP provider I was using before. I found MaxCDN, and they were just what I was looking for. I now see responses in the 50 ms or less range, and www.webpagetest.org reports 96/100 point results. It’s incredibly fast!! Here is a proof:

WebPageTest.org results

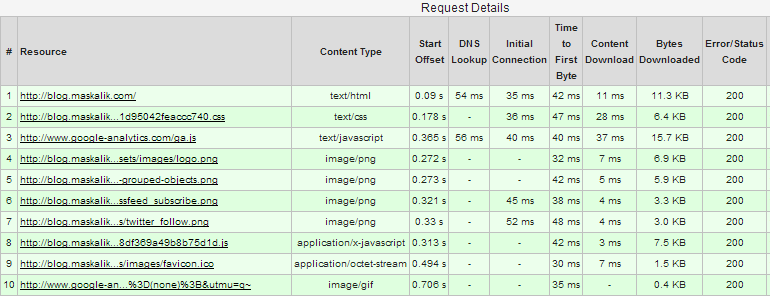
In addition, MaxCDN is doing a great job of zipping all of my content for me automatically.

Plugins

Jekyll has a big ecosystem, and there are a lot of plugins that are available. One in particular that I found very useful is jekyll-assets. It’s very easy to set up, and it will take care of your minification, combining of css/js files, coffee script conversion, and cache busting, etc.

What about comments

Aren’t comments something that your platform needs? How do you go about that? Well, that’s simple—you can install a 3rd party solution like Disqus, or you can roll your own with Javascript and Windows Azure mobile services. In this day and age, anything that requires a database can be sprinkled on the page with Javascript, and 3rd parties will host your data very cheaply.

Extras

I’ve created a simple publishing application that you can run from the root of your Jekyll site. It will take contents of the site folder, figure out the differences between local copy and Amazon S3, and publish those differences to Amazon S3. Finally, it will purge cache in MaxCDN.

Summary

By keeping things simple and ignoring prior biases, we gain incredible benefits that solve problems perfectly. I’m excited and looking forward to blogging on my new, shiny, statically-generated site.

I’ve been practicing Test Driven Development (TDD) for a while and recently I learned that my tests were not really helping but actually becoming a huge burden. So for the past couple months I’ve been on a journey to truly master the TDD and I’m at the point now where I think I have a much better understanding of it. Through my struggles and discoveries with doing TDD comes out this blog post.

Why Do We Need TDD

TDD helps you to design your software components interactively. How does it help you? You write specifications or behaviors of your component and then your write a solution for that behavior and then you refactor to make the code clean. It’s extremely valuable in terms of providing safety net so you can have confidence while refactoring, and keep code clean and maintainable while not breaking desired specifications.

It’s Important to Understand What TDD Doesn’t Do

It doesn’t help you to find bugs, or regression test the whole system. It also doesn’t help you to test interaction between components or if your application is configured properly. There are other means to do that like automated integration tests with projects like Selenium.

Common Mistakes or When Safety Net Becomes Maintenance Hell

I believe almost all developers who start with TDD without guidance of an experienced TDD practitioner are destined to repeat common mistakes and fail. I’ve done this myself, even though I’ve read few TDD books and I thought I had it. Over the last 3 years I’ve been working on and off on a big and complex calculation functionality piece and used TDD to create a regression safety net. I wrote a huge amount of tests but when the time came to change functionality it didn’t go as smooth as planned. Any changes in the systems behavior would break a huge amount of tests and I could see that my tests were making things a lot more difficult instead of helping. So I went on to really understand TDD and truly learn it. I learned that writing a safety net that would actually help is not easy, requires a true understanding of the TDD, use of the design patterns to remove duplicatio,n and keeping unit tests DAMP (Descriptive and Meaninful Phrases).

Trully Understanding TDD

The most important thing: Through each unit test you are specifying one behavior of the component and NOT testing methods of your class. With TDD your unit tests or your specifications become the documentation of how your components are expected to work. BDD tries to address this issue by changing the terminology, so you think in terms of behaviors rather than tests. But to me it’s all the same TDD just with different set of mind. When you truly understand TDD you would do BDD naturally. (I’m not an expert, these are just my understanding from what I learned and research)

Your components must be tested outside-in. Starting with the public API of your service for example. We’ll address some of the setup design patterns to make this possible because you will need to have a descent amount of setup code in order to test the whole component. And since this setup code needs to be in every test and it has to be easy to read and understand.

Keys to Success

  • Easy to read tests, your tests must be DAMP, they should be easy to read and understand. Extra special care need to be taken when writing test names because you want your test to fail in the future and you want a person who will read your test to understand exactly what happened without looking at internals. BDD addresses it with specifying Given When Then. With frameworks like xUnit I like to follow Subject_Scenario_Result in my method names.

  • Tests must specify one thing, and one thing ONLY. Your unit tests verifies the behavior of only one specification. If you throw in assertions about unrelated behaviors you will soon discover that when a certain thing changes many of your tests will fail and you won’t be able to tell what went wrong, therefore defeating the purpose of unit tests.

  • Outside in, you don’t want to test each individual method of your classes, but rather component’s public API, for example if you have a service that returns available shipping options and you a public interface for that method is CalculateShippingOptions you want to specify functionality through that method.

  • Tests are really specifications or behaviors of your code. Think of it as documentation for your components.

  • Mock all external components which functionality you are not trying to test.

  • Treat your unit tests code as your production code, refactoring and keeping it clean is mandatory.

  • Don’t over-specify your system. Only leave specs that are absolutely necessary in order for your component to work properly. 100% test coverage is meaningless it creates unnecessary work and maintenance burden and it’s not pragmatic.

Design Patterns to Help

Writing tests outside-in will require a lot of setup for each test and we want that setup code to be reused. BDD frameworks address it by reusing scenario sentences. And for TDD we have design patterns that help immensely.

Builder Pattern

First pattern is the Builder Pattern . When you are creating a scenario for your test, rather then setting up objects manually you should have a class that does that for you. For example you would usually build you objects manually like this:

var shippingOption = new ShippingOption();
shippingOption.ServiceLevel = 888;
shippingOption.Name = "Ground Shipping"
... etc
var shippingOptions = new List<ShippingOption>();
shippingOptions.Add(shippingOption);

That setup code can be huge, you can replace it with ShippingOptionsBuilder

public class ShippingOptionsBuilder
{
	private List<ShippingOption> _options;

	public ShippingOptionsBuilder()
	{
		_options = new List<ShippingOptions>();
	}

	public ShippingOptionsBuilder AddGround()
	{
		var shippingOption = new ShippingOption();
		shippingOption.ServiceLevel = 888;
		shippingOption.Name = "Ground Shipping"
		...etc
		_options.Add(shippingOption);
		return this;
	}
	public List<ShippingOptions> Build()
	{
		return _options;
	}
}

So now to build your setup code you simply do this:

var options = new ShippingOptionsBuilder().AddGround().Build();

And if you later on add other options like next day air you would simply add another method and call it like this:

var options = new ShippingOptionsBuilder().AddGround().AddNextDayAir().Build();

It’s very simple but powerful, if your ShippingOption object changes your setup code would only change in one place rather than in many unit tests. And it also help with readability I can quickly read that line and see exactly what we have in our setup.

Suite Fixture Setup

A component might have multiple dependencies and we need a way to abstract the creation of the component so it can be easily changed later without us needing to modify a lot of tests. This is where suite fixture comes in to play.

Let’s say we have a ShippingCalculator that will be tested but it takes a couple of dependencies. We’ll create a fixture so it can be reused across tests.

public class ShippingCalculatorFixture
{
	public IShippingRepository ShippingRepository { get; set; }
	public IZipRepository ZipRepository { get; set; }

	public ShippingCalculatorFixture()
	{
		ShippingRepository = new Mock<IShippingRepository>().Object;
		ZipRepository = new Mock<ZipRepository>().Object;
	}

	internal ShippingCalculator CreateSut()
	{
		return new ShippingCalculator(ShippingRepository, ZipRepository);;
	}
}

So now in your setup you can create an instance of the fixture that will hold reference to your dependencies and also create a system under test component.

[SetUp]
public Init()
{
	Fixture = new ShippingCalculatorFixture();
	ShippingCalculator = Fixture.CreateSut();
}

[Test]
public ExampleOfTheFixtureSetup()
{
	..your arrange
	//Act
	ShippingCalculator.Calculate();
	... your assert
}

For example we need in our test to mock out repository. It’s easy to access it through the fixture object that holds a reference to it.

[Test]
public ExampleOfTheFixtureSetupWithDependency()
{
	..your arrange
	Mock.Get(Fixture.ShippingRepository).Setup(p => SomeMethod()).Returns(true);

	//Act
	ShippingCalculator.Calculate();
	... your assert
}

You can also create an extension method

internal static class MockExtensions
{
		internal static Mock<T> GetMock<T>(this T obj) where T : class
		{
			return Mock<T>.Get(obj);
		}
}

So it can be simplified like this

[Test]
public ExampleOfTheFixtureSetupWithDependency()
{
	..your arrange
	Fixture.ShippingRepository.GetMock.Setup(p => SomeMethod()).Returns(true);

	//Act
	ShippingCalculator.Calculate();
	... your assert
}

Some really good resources that helped me tremendously with my learning were:

http://blog.stevensanderson.com/2009/08/24/writing-great-unit-tests-best-and-worst-practises/

http://blog.stevensanderson.com/2009/11/04/selective-unit-testing-costs-and-benefits/

http://blog.ploeh.dk/2009/01/28/Zero-FrictionTDD/

Great pluralsight course that goes deeper into patterns: http://pluralsight.com/training/courses/TableOfContents?courseName=advanced-unit-testing

Good luck with your mastering Test Driven Development! Please let me know if I miss something or you might think I’m completely wrong.

I’ve been reviewing MiniProfiler library source code and here are things that I though were unusual and neat. The reason why it caught my attention is because it’s not something that I use every day so I wanted to list it here. Also, I know that developers who I work with at my job don’t use these features also so they could probably find it interesting.

I’ve noticed that classes that inherit from an interface are grouped together in the Visual Studio like this:

That is pretty neat, that way you don’t have to hunt around for all implementations of the interface and it’s all in one place.

By default Visual Studio groups related .aspx files like .cs and .designer.cs. If you look at the .csproj file files that are nested under the main file have a DependenUpon element under the the parent compile element.

<Compile Include="SiteMap.aspx.designer.cs">
	<DependentUpon>SiteMap.aspx</DependentUpon>
</Compile>

By default Visual Studio does not have an option to group arbitrary files but it could easily be done by editing a csproj file. So it’s like a trick to work around default functionality. If you don’t want to manually update that file there is a small little plugin NestIn that will do that for you.

Nested Settings Class

MiniProfiler has a nested static class so you can access settings by going to MiniProfiler.Settings.SomeSetting. I like that composition for settings and it’s pretty easy to do. All you have to do is to set your classes partial and then create a static Settings subclass underneath the partial class like this:

    partial class MiniProfiler
    {
        /// <summary>
        /// Various configuration properties.
        /// </summary>
        public static class Settings
        {

You can also group your settings class with your main class and that’s what is done in MiniProfiler.

Default Values

MiniProfiler.Settings uses DefaultValue Attributes on properties. It’s important to note that this attribute does not initialize the property and that needs to be done separately.

[DefaultValue(20)]
public static int MaxUnviewedProfiles { get; set; }

Initialization happens using reflection in the static constructor of the Settings class.

static Settings()
{
var props = from p in typeof(Settings).GetProperties(BindingFlags.Public | BindingFlags.Static)
let t = typeof(DefaultValueAttribute)
where p.IsDefined(t, inherit: false)
let a = p.GetCustomAttributes(t, inherit: false).Single() as DefaultValueAttribute
select new { PropertyInfo = p, DefaultValue = a };

foreach (var pair in props)
{
	pair.PropertyInfo.SetValue(null, Convert.ChangeType(pair.DefaultValue.Value, pair.PropertyInfo.PropertyType), null);
}
...

I think that’s a nice way to initialize the properties. It keeps declaration and initialization together and easier to see. I wouldn’t do something like that if you had a small settings class and would just initialize in the constructor. But on the large classes it makes sense.

Hooking up Routes

There is a single handler file that has a static method to initialize itself as a route. And it gets called when MiniProfiler sets up ProfilerProvider. What I found cool about this file is that it handles its own registration into routes.

public static void RegisterRoutes()
{
	var routes = RouteTable.Routes;
	var handler = new MiniProfilerHandler();
	var prefix = MiniProfiler.Settings.RouteBasePath.Replace("~/", string.Empty).EnsureTrailingSlash();

	using (routes.GetWriteLock())
	{
		var route = new Route(prefix + "{filename}", handler)
		{
		// we have to specify these, so no MVC route helpers will match, e.g. @Html.ActionLink("Home", "Index", "Home")
		Defaults = new RouteValueDictionary(new { controller = "MiniProfilerHandler", action = "ProcessRequest" }),
		Constraints = new RouteValueDictionary(new { controller = "MiniProfilerHandler", action = "ProcessRequest" })
		};

		// put our routes at the beginning, like a boss
		routes.Insert(0, route);
	}
}

Keep in mind , in order for static files like .js and .css to get routed to the managed module you will need to turn on

<system.webServer>
	<modules runAllManagedModulesForAllRequests="true" />
</system.webServer>

or if you don’t want to turn it on globally you can do it based on the specific url like this:

<system.webServer>
	...
	<handlers>
	<add name="MiniProfiler" path="mini-profiler-resources/*" verb="*" type="System.Web.Routing.UrlRoutingModule" resourceType="Unspecified" preCondition="integratedMode" />
	</handlers>
</system.webServer>

You can basically accomplish the same thing if you create an ashx handler and configure it in the handlers section. By setting up routes you can at least cover clients that have runAllManagedModulesForAllRequest set to true, so they would have one less thing to worry about. But it would also cause some frustration for people who don’t.

That’s it for now, I’ll list more as I’m working through it.